虚拟机win7镜像安装教程
- 时间:2024年07月31日 10:48:40 来源:魔法猪系统重装大师官网 人气:6635


有小伙伴不习惯使用电脑预装的win10系统,想要在虚拟机上安装win7镜像系统使用,但是自己不知道如何安装win7镜像怎么办.下面小编就给大家演示下详细的虚拟机win7镜像安装教程.
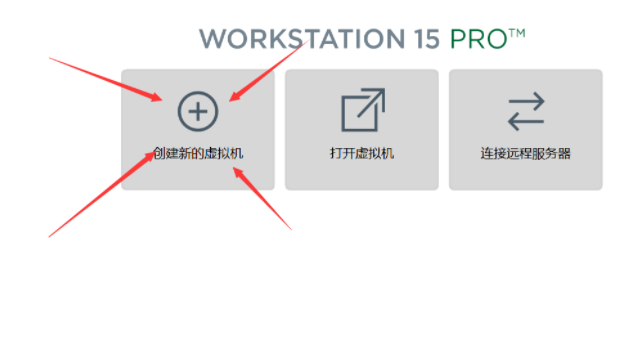
1.打开VMWareWorkstation并单击新建虚拟机。

2.弹出的页面选择自定义,再点击下一步。

3.兼容性选择我是直接默认。点击下一步。

4.选择稍后安装操作系统,点击下一步。

5.选择你想要安装系统对应的选项,这里我们装的是windows7的系统,所以选择MicrosoftWindows,点击下一步。

6.在你相对内存比较大的磁盘新建一个文件夹,当作镜像系统的安装路径。虚拟机的名称喜欢就好。再下一步。

7.固件类型直接默认BIOS。点击下一步。

8.分配给Windows7的处理器个数,2个应该足够。本蒟蒻电脑是四核的处理器。再点击下一步。

9.接下来是给虚拟机分配内存,直接默认就好,后面还是可以改的,但是如果在这里想改的话,要注意右边框框的值应该是4的倍数。点击下一步。

10.网络类型还是默认NAT。点击下一步。

11.这波继续默认,点击下一步。(整的我都不好意思了,一直默认)

12.磁盘类型选择SCSI,IDE只支持四块盘,而SCSI则更多。点击下一步。

13.这里我们创建新磁盘,点击下一步。

14.首先内存大小选择160G,这里的160G并不是值直接给你整个160G的内存,而是指在你用这个操作系统的过程中,日积月累,能接受的最大内存,所以刚开始装好还是很小的。另外,下面的选项选“存储为单个文件”。多个文件的选项是针对FAT32分区的,而正常NTFS分区选择单个文件。

15.接下来的界面是产生了一个虚拟硬盘,.vmdk是虚拟硬盘文件后缀名。直接点击下一步。

16.点击完成。到这里就相当于把硬件配置好了。

17.点击左侧设备栏里任一设备可进入如下图所示界面,对于用不到的设备(例如:USB控制器、声卡、打印机)可以直接选中右下角移除。后期想要也可以右下角添加。

18.还是上面界面,点击光驱,再点击使用ISO映像文件,路径是下载Windows7镜像文件的保存路径。再点击右下角的确定。

19.我TM直接开机!直接下一步!直接点现在安装!

20.许可证点击接受直接下一步。

21.选择自定义安装,咱能听他默认摆布?

22.接下来千万别点下一步!点右下方驱动器选项,再点击新建,就是新建一个系统盘吧,做测试40G够了,点击应用。产生的100M的那个东西,因为一般的盘和操作系统都会加密保证安全,那个是用来存放加密解密程序的,不用管。点击下一步。


23.很好,硬等…接下来用户名和计算机名称我就不放截图了,看心情取名字呗。点击下一步。设置一下密码,再下一步。
24.下图我选的是第二个,之后点击下一步。

25.下图我选择的是工作网络。有一说一,从安全的角度来考虑,工作网络是最不安全的,因为它的好多接口都是打开的。

26.OVER!!!

以上就是虚拟机win7镜像安装教程,希望能帮助到大家。
win7镜像,虚拟机win7镜像安装,如何安装win7镜像