Mac电脑使用Xcode上传代码至GitHub
- 时间:2015年04月02日 15:16:33 来源:魔法猪系统重装大师官网 人气:12702
几乎所有iOS程序员都上过GitHub寻找开源类库,的确,GitHub上有大量优秀的开源类库供大家学习。但是如何在Xcode中上传代码至GitHub呢?
开始之前先安装git
从源代码安装
若是条件允许,从源代码安装有很多好处,至少可以安装最新的版本。Git 的每个版本都在不断尝试改进用户体验,所以能通过源代码自己编译安装最新版本就再好不过了。有些 Linux 版本自带的安装包更新起来并不及时,所以除非你在用最新的 distro 或者 backports,那么从源代码安装其实该算是最佳选择。
Git 的工作需要调用 curl,zlib,openssl,expat,libiconv 等库的代码,所以需要先安装这些依赖工具。在有 yum 的系统上(比如 Fedora)或者有 apt-get 的系统上(比如 Debian 体系),可以用下面的命令安装:
$ yum install curl-devel expat-devel gettext-devel \
    openssl-devel zlib-devel

    $ apt-get install libcurl4-gnutls-dev libexpat1-dev gettext \
    libz-dev libssl-dev
之后,从下面的 Git 官方站点下载最新版本源代码:
http://git-scm.com/download
然后编译并安装:
$ tar -zxf git-1.7.2.2.tar.gz
    $ cd git-1.7.2.2
    $ make prefix=/usr/local all
    $ sudo make prefix=/usr/local install
现在已经可以用 git 命令了,用 git 把 Git 项目仓库克隆到本地,以便日后随时更新:
$ git clone git://git.kernel.org/pub/scm/git/git.git
在 Mac 上安装
在 Mac 上安装 Git 有两种方式。最容易的当属使用图形化的 Git 安装工具,界面如图 1-7,下载地址在:
http://code.google.com/p/git-osx-installer
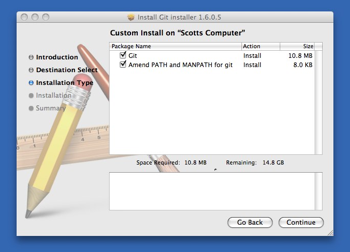
图 1-7. Git OS X 安装工具
另一种是通过 MacPorts (http://www.macports.org) 安装。如果已经装好了 MacPorts,用下面的命令安装 Git:
$ sudo port install git-core +svn +doc +bash_completion +gitweb
这种方式就不需要再自己安装依赖库了,Macports 会帮你搞定这些麻烦事。一般上面列出的安装选项已经够用,要是你想用 Git 连接 Subversion 的代码仓库,还可以加上 +svn 选项,具体将在第八章作介绍。(译注:还有一种是使用 homebrew(https://github.com/mxcl/homebrew):brew install git。)
开始
首先我们新建一个工程,记得要勾选Create git repository on:

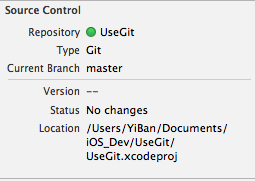
这说明使用Source Control,会默认在工程中创建git repository。然后工程新建完成后,会在右侧边栏看到这些信息,说明已经启用Source Control
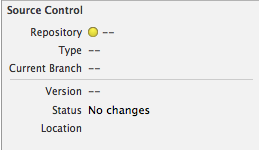
如果没有使用Source Control,则是这样的:
现在我们已经在工程中启用了Source Control,这样就可以使用git来管理工程版本了
但是如果我们想对一个未启用git的工程加入git的功能怎么做呢?我们可以使用命令行来开启此功能,新建一个工程,不勾选Create git repository on,此时我们没有开启Source Control,然后我们手动创建git管理,如下图所示:
YiBantekiiMac-3:UseGit YiBan$ cd /Users/YiBan/Documents/iOS_Dev/ManualGitDemo
YiBantekiiMac-3:ManualGitDemo YiBan$ git init
Initialized empty Git repository in /Users/YiBan/Documents/iOS_Dev/ManualGitDemo/.git/
使用
git init
来初始化一个空的git仓库,现在使用ls-la命令查看目录下的所有文件(包含隐藏文件)
total 16
drwxr-xr-x   7 YiBan  staff   238  5 12 16:10 .
drwxr-xr-x  52 YiBan  staff  1768  5 12 16:06 ..-rw-r--r--@  1 YiBan  staff  6148  5 12 16:10 .DS_Store
drwxr-xr-x   9 YiBan  staff   306  5 12 16:06 .git
drwxr-xr-x  12 YiBan  staff   408  5 12 16:06 ManualGitDemo
drwxr-xr-x   5 YiBan  staff   170  5 12 16:06 ManualGitDemo.xcodeproj
drwxr-xr-x   5 YiBan  staff   170  5 12 16:06 ManualGitDemoTests
此时我们看到除了三个文件之外还有两个隐藏文件,.DS_Store和.git,.DS_Store是由OS X生成的文件,包含了文件夹中的位置属性,.git则是启用了Source Control自动生成的目录,然后使用git status查看当前状态:
YiBantekiiMac-3:ManualGitDemo YiBan$ git status On branch master Initial commit Untracked files: (use "git add..." to include in what will be committed) .DS_Store ManualGitDemo.xcodeproj/ ManualGitDemo/ ManualGitDemoTests/nothing added to commit but untracked files present (use "git add" to track)
说明初始化成功了,显示出了未被追踪的文件。不过我们并不希望把.DS_Store也加入的git中,因为那文件对我们没有任何用处,我们可以忽略它,具体做法是:新建一个文件,命名为.gitignore,然后使用文本编辑器输入以下信息:
# Xcode

.DS_Store

*/build/*

*.pbxuser
!default.pbxuser
*.mode1v3
!default.mode1v3
*.mode2v3
!default.mode2v3
*.perspectivev3
!default.perspectivev3
xcuserdata
profile
*.moved-aside
DerivedData
.idea/
*.hmap
保存至工程文件夹中,这样我们目录中就多出一个.gitignore文件了,这时我们再用git status命令查看当前状态:
YiBantekiiMac-3:ManualGitDemo YiBan$ git status On branch master Initial commit Untracked files: (use "git add..." to include in what will be committed) .gitignore ManualGitDemo.xcodeproj/ ManualGitDemo/ ManualGitDemoTests/ nothing added to commit but untracked files present (use "git add" to track)
这里看到已经没有.DS_Store了,说明.gitignore已经把.DS_Store忽略了。现在可以提交了,使用
git add .
此命令先将文件添加至暂存区域,但还没有提交,查看下状态:
YiBantekiiMac-3:ManualGitDemo YiBan$ git status On branch master Initial commit Changes to be committed: (use "git rm --cached..." to unstage) new file: .gitignore new file: ManualGitDemo.xcodeproj/project.pbxproj new file: ManualGitDemo.xcodeproj/project.xcworkspace/contents.xcworkspacedata new file: ManualGitDemo/AppDelegate.h new file: ManualGitDemo/AppDelegate.m new file: ManualGitDemo/Base.lproj/Main.storyboard new file: ManualGitDemo/Images.xcassets/AppIcon.appiconset/Contents.json new file: ManualGitDemo/Images.xcassets/LaunchImage.launchimage/Contents.json new file: ManualGitDemo/ManualGitDemo-Info.plist new file: ManualGitDemo/ManualGitDemo-Prefix.pch new file: ManualGitDemo/ViewController.h new file: ManualGitDemo/ViewController.m new file: ManualGitDemo/en.lproj/InfoPlist.strings new file: ManualGitDemo/main.m new file: ManualGitDemoTests/ManualGitDemoTests-Info.plist new file: ManualGitDemoTests/ManualGitDemoTests.m new file: ManualGitDemoTests/en.lproj/InfoPlist.strings
现在进行提交,使用git commit -m "Initail"命令,引号内的内容是提交的注释,随便写什么都可以:
YiBantekiiMac-3:ManualGitDemo YiBan$ git commit -m "Initial"[master (root-commit) 83bbefc] Initial 17 files changed, 803 insertions(+)
 create mode 100644 .gitignore
 create mode 100644 ManualGitDemo.xcodeproj/project.pbxproj
 create mode 100644 ManualGitDemo.xcodeproj/project.xcworkspace/contents.xcworkspacedata
 create mode 100644 ManualGitDemo/AppDelegate.h
 create mode 100644 ManualGitDemo/AppDelegate.m
 create mode 100644 ManualGitDemo/Base.lproj/Main.storyboard
 create mode 100644 ManualGitDemo/Images.xcassets/AppIcon.appiconset/Contents.json
 create mode 100644 ManualGitDemo/Images.xcassets/LaunchImage.launchimage/Contents.json
 create mode 100644 ManualGitDemo/ManualGitDemo-Info.plist
 create mode 100644 ManualGitDemo/ManualGitDemo-Prefix.pch
 create mode 100644 ManualGitDemo/ViewController.h
 create mode 100644 ManualGitDemo/ViewController.m
 create mode 100644 ManualGitDemo/en.lproj/InfoPlist.strings
 create mode 100644 ManualGitDemo/main.m
 create mode 100644 ManualGitDemoTests/ManualGitDemoTests-Info.plist
 create mode 100644 ManualGitDemoTests/ManualGitDemoTests.m
 create mode 100644 ManualGitDemoTests/en.lproj/InfoPlist.strings
再查看下状态:
YiBantekiiMac-3:ManualGitDemo YiBan$ git status
On branch master
nothing to commit, working directory clean
好了,当前工作区是干净的,代码都已经提交完毕了。我们可以用Xcode提交代码,也可以用命令来提交,但是用命令行的话可以做的事情更多一些。使用Xcode可以查看提交的历史纪录,Source Control->History:

添加工程至GitHub
首先必须有GitHub的帐号,没有的话去注册一个,并且还要创建SSH,GitHub使用了公私密钥,确保与你的电脑通讯过程是安全的。
SSH创建过程是这样的:
1. 在命令行输入cd ~/.ssh,然后ls,看看此文件夹下有哪些文件,如果有id_rsa.pub或者id_dsa.pub(名字可能会不同),说明你已经有SSH keys了,你可以将它添加到你的账户中
2. 如果没有的话,你讲得到"No such file or directory "这个错误信息,此时你可以通过命令生成出来:
ssh-keygen -t rsa -C "YOUR EMAIL"
在那里填写你的email地址,之后会被要求填写密码,此时的SSH keys就生成好了,有了SSH Keys后将其添加至你的GitHub账户中就可以了,在账户设置中找到SSH keys这一项,然后填写title和key,现在,你的SSH Key就和GitHub账户绑定了
前往个人主页,新建一个repository(网页右上方),会要输入一些信息:
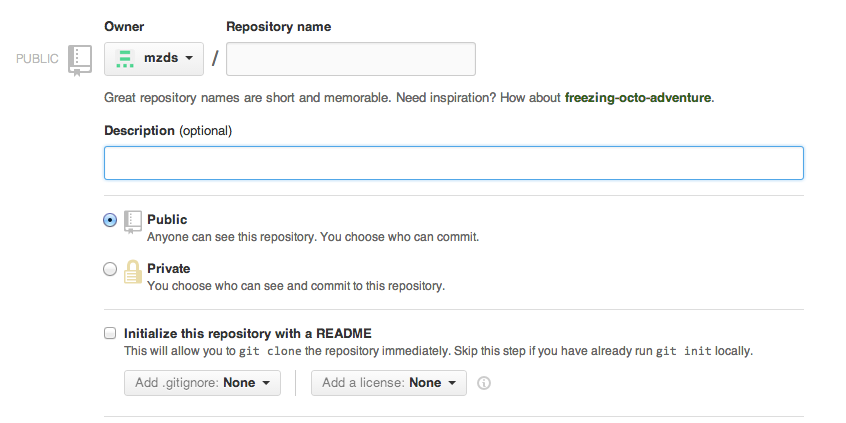
输入Repository name和描述,然后选创建,会看到repository的链接:

把链接赋值下来,前往Xcode中,Source Control->第一项->Configure...,之后选Remotes:
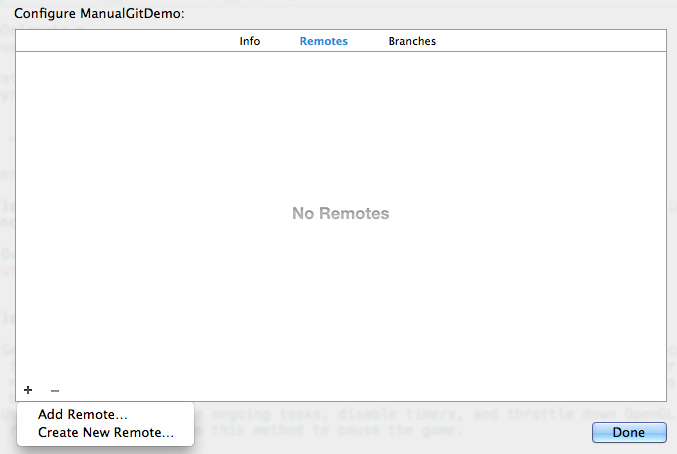
Add Remote中,输入Name(你工程的名字)和Address(之前的链接地址),然后Source Control->Push,选择刚刚新建的链接,Push~
现在刷新下GitHub主页,你的工程已经添加成功了~!


